0x00 前言

Slim 是由《PHP The Right Way》作者开发的一款 PHP 微框架,代码量不算多(比起其它重型框架来说),号称可以一下午就阅读完(我觉得前提是熟悉 Slim 所用的组件)。不过比起其它框架来说真的还算容易阅读的了,所以是比较适合我这种新手学习一款框架。因为文章篇幅限制所以采用抓大放小的方式所以会避过一些不重要的内容(我才不会告诉你有些地方我还没看很明白/(ㄒoㄒ)/)。
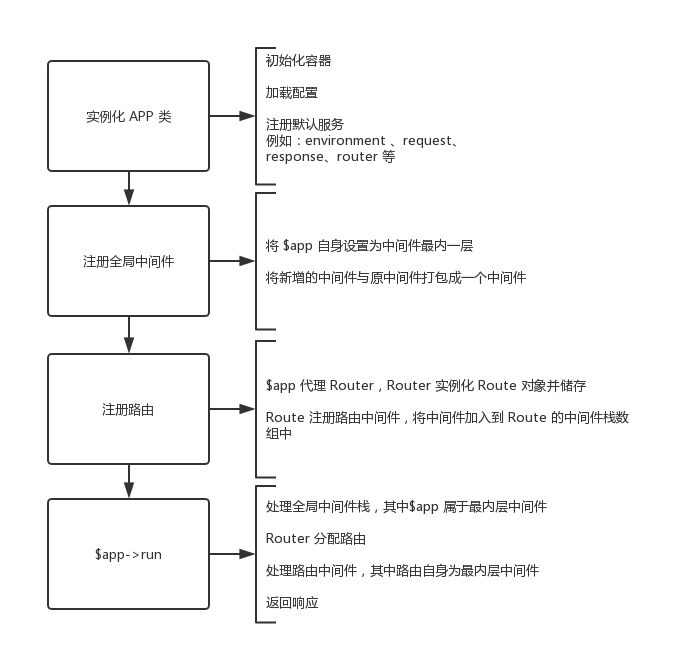
0x01 生命周期

Slim 生命周期

0x02 从入口文件开始

Slim 项目的 README 里我们可以看见官方所给出的入口文件 index.php 的 demo,真的是很微(⊙﹏⊙)。

1
2
3
4
5
6
7
8
9
10
11
<?php

require 'vendor/autoload.php';

$app = new Slim\App();

$app->get('/hello/{name}', function ($request, $response, $args) {
return $response->getBody()->write("Hello, " . $args['name']);
});

$app->run();

上面这段代码作用如下

  • 引入 composer 的自动加载脚本 vendor/autoload.php
  • 实例化 App
  • 定义一个闭包路由
  • App 实例执行 run 方法

很容易看出整段代码最重要的便是 App 类,下面我们来分析一下 App 类。

0x03 构造一切的核心 App

首先我们看看 App 的构造函数

1
2
3
4
5
6
7
8
9
10
11
12
13
14
15
16
/**
* Create new application
*
* @param ContainerInterface|array $container Either a ContainerInterface or an associative array of app settings
* @throws InvalidArgumentException when no container is provided that implements ContainerInterface
*/
public function __construct($container = [])
{
if (is_array($container)) {
$container = new Container($container);
}
if (!$container instanceof ContainerInterface) {
throw new InvalidArgumentException('Expected a ContainerInterface');
}
$this->container = $container;
}

这里我们发现 App 依赖一个容器接口 ContainerInterface。如果没有传递容器,构造函数将实例化 Container 类,作为 App 的容器。因为 App 依赖的是 ContainerInterface 接口而不是具体实现,所以我们可以使用任意实现了 ContainerInterface 接口的容器作为参数注入 App 但是因为我们现在研究 Slim 框架所以还是要分析 Container 类。

0x04 容器 Container

Slim 的容器是基于 pimple/pimple 这个容器实现的(想了解 Pimple 容器可以看这篇文章 PHP容器–Pimple运行流程浅析),Container 类增加了配置用户设置、注册默认服务的功能并实现了 ContainerInterface 接口。部分代码如下:

1
2
3
4
5
6
7
8
9
10
11
12
13
14
15
16
17
18
19
20
21
22
23
24
25
26
27
28
29
30
31
32
private $defaultSettings = [
// 篇幅限制省略不贴
];

public function __construct(array $values = [])
{
parent::__construct($values);

$userSettings = isset($values['settings']) ? $values['settings'] : [];
$this->registerDefaultServices($userSettings);
}

// 注册默认服务
private function registerDefaultServices($userSettings)
{
$defaultSettings = $this->defaultSettings;

/**
* 向容器中注册 settings 服务
* 该服务将返回 App 相关的设置
*
* @return array|\ArrayAccess
*/
$this['settings'] = function () use ($userSettings, $defaultSettings) {
// array_merge 将 $defaultSettings 和 $userSettings 合并
// $defaultSettings 与 $userSettings 中相同的键名会覆盖为 $userSettings 的值
return new Collection(array_merge($defaultSettings, $userSettings));
};

$defaultProvider = new DefaultServicesProvider();
$defaultProvider->register($this);
}

实例化该容器时的任务就是将 $values 数组包含的服务注册到容器里,如果 $values 存在 settings 则将其和$defaultSettings 合并后再注册到容器中,最后通过 DefaultServicesProvider 将默认的服务都注册到容器里。

0x05 注册默认服务 DefaultServicesProvider

DefaultServicesProviderregister 方法向容器注册了许多服务包括 environmentrequestresponserouter 等,由于篇幅限制下面只展示 register 方法里比较重要的片段。

1
2
3
4
5
6
7
8
9
10
11
12
13
14
15
16
17
18
19
20
21
22
23
24
25
26
27
28
29
30
31
32
33
34
35
36
37
38
39
40
41
42
43
44
45
46
47
48
49
50
51
52
53
54
55
56
57
58
59
60
61
62
63
64
if (!isset($container['environment'])) {
/**
* This service MUST return a shared instance
* of \Slim\Interfaces\Http\EnvironmentInterface.
*
* @return EnvironmentInterface
*/
$container['environment'] = function () {
return new Environment($_SERVER);
};
}

if (!isset($container['request'])) {
/**
* PSR-7 Request object
*
* @param Container $container
*
* @return ServerRequestInterface
*/
$container['request'] = function ($container) {
return Request::createFromEnvironment($container->get('environment'));
};
}

if (!isset($container['response'])) {
/**
* PSR-7 Response object
*
* @param Container $container
*
* @return ResponseInterface
*/
$container['response'] = function ($container) {
$headers = new Headers(['Content-Type' => 'text/html; charset=UTF-8']);
$response = new Response(200, $headers);

return $response->withProtocolVersion($container->get('settings')['httpVersion']);
};
}

if (!isset($container['router'])) {
/**
* This service MUST return a SHARED instance
* of \Slim\Interfaces\RouterInterface.
*
* @param Container $container
*
* @return RouterInterface
*/
$container['router'] = function ($container) {
$routerCacheFile = false;
if (isset($container->get('settings')['routerCacheFile'])) {
$routerCacheFile = $container->get('settings')['routerCacheFile'];
}

$router = (new Router)->setCacheFile($routerCacheFile);
if (method_exists($router, 'setContainer')) {
$router->setContainer($container);
}

return $router;
};
}

0x06 注册路由

在入口文件中我们可以看见通过 $app->get(...) 注册路由的方式,在 App 类里我们看见如下代码:

1
2
3
4
5
6
7
8
9
10
11
12
13
14
15
16
17
18
19
20
21
22
23
24
25
26
27
28
29
30
31
32
33
34
35
36
37
38
39
40
41
42
43
44
/********************************************************************************
* Router proxy methods
*******************************************************************************/

/**
* Add GET route
*
* @param string $pattern The route URI pattern
* @param callable|string $callable The route callback routine
*
* @return \Slim\Interfaces\RouteInterface
*/
public function get($pattern, $callable)
{
return $this->map(['GET'], $pattern, $callable);
}
/**
* Add route with multiple methods
*
* @param string[] $methods Numeric array of HTTP method names
* @param string $pattern The route URI pattern
* @param callable|string $callable The route callback routine
*
* @return RouteInterface
*/
public function map(array $methods, $pattern, $callable)
{
// 若是闭包路由则通过 bindTo 方法绑定闭包的 $this 为容器
if ($callable instanceof Closure) {
$callable = $callable->bindTo($this->container);
}
// 通过容器获取 Router 并新增一条路由
$route = $this->container->get('router')->map($methods, $pattern, $callable);
// 将容器添加进路由
if (is_callable([$route, 'setContainer'])) {
$route->setContainer($this->container);
}
// 设置 outputBuffering 配置项
if (is_callable([$route, 'setOutputBuffering'])) {
$route->setOutputBuffering($this->container->get('settings')['outputBuffering']);
}

return $route;
}

App 类中的 getpostputpatchdeleteoptionsany 等方法都是对 Routermap 方法简单封装,让我好奇的那路由组是怎么实现的?下面我们看看 Slim\Appgroup 方法,示例如下:

1
2
3
4
5
6
7
8
9
10
11
12
13
14
15
16
17
18
19
20
21
22
23
24
/**
* Route Groups
*
* This method accepts a route pattern and a callback. All route
* declarations in the callback will be prepended by the group(s)
* that it is in.
*
* @param string $pattern
* @param callable $callable
*
* @return RouteGroupInterface
*/
public function group($pattern, $callable)
{
// pushGroup 将构造一个 RouteGroup 实例并插入 Router 的 routeGroups 栈中,然后返回该 RouteGroup 实例,即 $group 为 RouteGroup 实例
$group = $this->container->get('router')->pushGroup($pattern, $callable);
// 设置路由组的容器
$group->setContainer($this->container);
// 执行 RouteGroup 的 __invoke 方法
$group($this);
// Router 的 routeGroups 出栈
$this->container->get('router')->popGroup();
return $group;
}

上面代码中最重要的是 $group($this); 这句执行了什么?我们跳转到 RouteGroup 类中找到 __invoke 方法,代码如下:

1
2
3
4
5
6
7
8
9
10
11
12
13
14
15
16
/**
* Invoke the group to register any Routable objects within it.
*
* @param App $app The App instance to bind/pass to the group callable
*/
public function __invoke(App $app = null)
{
// 处理 callable,不详细解释请看 CallableResolverAwareTrait 源代码
$callable = $this->resolveCallable($this->callable);
// 将 $app 绑定到闭包的 $this
if ($callable instanceof Closure && $app !== null) {
$callable = $callable->bindTo($app);
}
// 执行 $callable 并将 $app 传参
$callable($app);
}

注: 对 bindTo 方法不熟悉的同学可以看我之前写的博文 PHP CLOURSE(闭包类) 浅析

上面的代码可能会有点蒙但结合路由组的使用 demo 便可以清楚的知道用途。

1
2
3
4
5
6

$app->group('/users/{id:[0-9]+}', function () {
$this->map(['GET', 'DELETE', 'PATCH', 'PUT'], '', function ($request, $response, $args) {
// Find, delete, patch or replace user identified by $args['id']
});
});

App 类的 group 方法被调用时 $group($this) 便会执行,在 __invoke 方法里将 $app 实例绑定到了 $callable 中(如果 $callable 是闭包),然后就可以通过 $this->map(...) 的方式注册路由,因为闭包中的 $this 便是 $app。如果 $callable 不是闭包,还可以通过参数的方式获取 $app 实例,因为在 RouteGroup 类的 __invoke 方法中通过 $callable($app); 来执行 $callable

0x07 注册中间件

Slim 的中间件包括「全局中间件」和「路由中间件」的注册都在 MiddlewareAwareTrait 性状里,注册中间件的方法为 addMiddleware,代码如下:

1
2
3
4
5
6
7
8
9
10
11
12
13
14
15
16
17
18
19
20
21
22
23
24
25
26
27
28
29
30
31
32
33
34
35
36
37
38
39
40
41
42
43
44
45
/**
* Add middleware
*
* This method prepends new middleware to the application middleware stack.
*
* @param callable $callable Any callable that accepts three arguments:
* 1. A Request object
* 2. A Response object
* 3. A "next" middleware callable
* @return static
*
* @throws RuntimeException If middleware is added while the stack is dequeuing
* @throws UnexpectedValueException If the middleware doesn't return a Psr\Http\Message\ResponseInterface
*/
protected function addMiddleware(callable $callable)
{
// 如果已经开始执行中间件则不允许再增加中间件
if ($this->middlewareLock) {
throw new RuntimeException('Middleware can’t be added once the stack is dequeuing');
}
// 中间件为空则初始化
if (is_null($this->tip)) {
$this->seedMiddlewareStack();
}
// 中间件打包
$next = $this->tip;
$this->tip = function (
ServerRequestInterface $request,
ResponseInterface $response
) use (
$callable,
$next
) {
$result = call_user_func($callable, $request, $response, $next);
if ($result instanceof ResponseInterface === false) {
throw new UnexpectedValueException(
'Middleware must return instance of \Psr\Http\Message\ResponseInterface'
);
}

return $result;
};

return $this;
}

这个函数的功能主要就是将原中间件闭包和现中间件闭包打包为一个闭包,想了解更多可以查看 PHP 框架中间件实现

0x08 开始与终结 Run

在经历了创建容器、向容器注册默认服务、注册路由、注册中间件等步骤后我们终于到了 $app->run(); 这最后一步(ㄒoㄒ),下面让我们看看这 run 方法:

1
2
3
4
5
6
7
8
9
10
11
12
13
14
15
16
17
18
19
20
21
22
23
24
25
26
27
28
29
30
31
32
33
34
35
36
37
38
39
40
41
42
43
44
45
46
47
48
49
50
51
52
53
54
55
56
57
/********************************************************************************
* Runner
*******************************************************************************/

/**
* Run application
*
* This method traverses the application middleware stack and then sends the
* resultant Response object to the HTTP client.
*
* @param bool|false $silent
* @return ResponseInterface
*
* @throws Exception
* @throws MethodNotAllowedException
* @throws NotFoundException
*/
public function run($silent = false)
{
// 获取 Response 实例
$response = $this->container->get('response');

try {
// 开启缓冲区
ob_start();
// 处理请求
$response = $this->process($this->container->get('request'), $response);
} catch (InvalidMethodException $e) {
// 处理无效的方法
$response = $this->processInvalidMethod($e->getRequest(), $response);
} finally {
// 捕获 $response 以外的输出至 $output
$output = ob_get_clean();
}
// 决定将 $output 加入到 $response 中的方式
// 有三种方式:不加入、尾部追加、头部插入,具体根据 setting 决定,默认为尾部追加
if (!empty($output) && $response->getBody()->isWritable()) {
$outputBuffering = $this->container->get('settings')['outputBuffering'];
if ($outputBuffering === 'prepend') {
// prepend output buffer content
$body = new Http\Body(fopen('php://temp', 'r+'));
$body->write($output . $response->getBody());
$response = $response->withBody($body);
} elseif ($outputBuffering === 'append') {
// append output buffer content
$response->getBody()->write($output);
}
}
// 响应处理,主要是对空响应进行处理,对响应 Content-Length 进行设置等,不详细解释。
$response = $this->finalize($response);
// 发送响应至客户端
if (!$silent) {
$this->respond($response);
}
// 返回 $response
return $response;
}

注 1:对 try...catch...finally 不熟悉的同学可以看我之前写的博文 PHP 异常处理三连 TRY CATCH FINALLY

注 2:对 ob_startob_get_clean 函数不熟悉的同学也可以看我之前写的博文 PHP 输出缓冲区应用

可以看出上面最重要的就是 process 方法,该方法实现了处理「全局中间件栈」并返回最后的 Response 实例的功能,代码如下:

1
2
3
4
5
6
7
8
9
10
11
12
13
14
15
16
17
18
19
20
21
22
23
24
25
26
27
28
29
30
31
32
33
34
35
36
37
38
39
40
41
/**
* Process a request
*
* This method traverses the application middleware stack and then returns the
* resultant Response object.
*
* @param ServerRequestInterface $request
* @param ResponseInterface $response
* @return ResponseInterface
*
* @throws Exception
* @throws MethodNotAllowedException
* @throws NotFoundException
*/
public function process(ServerRequestInterface $request, ResponseInterface $response)
{
// Ensure basePath is set
$router = $this->container->get('router');
// 路由器设置 basePath
if (is_callable([$request->getUri(), 'getBasePath']) && is_callable([$router, 'setBasePath'])) {
$router->setBasePath($request->getUri()->getBasePath());
}

// Dispatch the Router first if the setting for this is on
if ($this->container->get('settings')['determineRouteBeforeAppMiddleware'] === true) {
// Dispatch router (note: you won't be able to alter routes after this)
$request = $this->dispatchRouterAndPrepareRoute($request, $router);
}

// Traverse middleware stack
try {
// 处理全局中间件栈
$response = $this->callMiddlewareStack($request, $response);
} catch (Exception $e) {
$response = $this->handleException($e, $request, $response);
} catch (Throwable $e) {
$response = $this->handlePhpError($e, $request, $response);
}

return $response;
}

然后我们看处理「全局中间件栈」的方法 ,在 MiddlewareAwareTrait 里我们可以看见 callMiddlewareStack 方法代码如下:

1
2
3
4
5
6
7
8
9
10
11
12
13
14
15
16
17
18
19
20
21
22
23
24
25
26
27
28
// 注释讨论的是在 Slim\APP 类的情景
/**
* Call middleware stack
*
* @param ServerRequestInterface $request A request object
* @param ResponseInterface $response A response object
*
* @return ResponseInterface
*/
public function callMiddlewareStack(ServerRequestInterface $request, ResponseInterface $response)
{
// tip 是全部中间件合并之后的闭包
// 如果 tip 为 null 说明不存在「全局中间件」
if (is_null($this->tip)) {
// seedMiddlewareStack 函数的作用是设置 tip 的值
// 默认设置为 $this
$this->seedMiddlewareStack();
}
/** @var callable $start */
$start = $this->tip;
// 锁住中间件确保在执行中间件代码时不会再增加中间件导致混乱
$this->middlewareLock = true;
// 开始执行中间件
$response = $start($request, $response);
// 取消中间件锁
$this->middlewareLock = false;
return $response;
}

看到上面可能会有疑惑,「路由的分配」和「路由中间件」的处理在哪里?如果你发现 $app 其实也是「全局中间件」处理的一环就会恍然大悟了,在 Slim\App__invoke 方法里,我们可以看见「路由的分配」和「路由中间件」的处理,代码如下:

1
2
3
4
5
6
7
8
9
10
11
12
13
14
15
16
17
18
19
20
21
22
23
24
25
26
27
28
29
30
31
32
33
34
35
36
37
38
39
40
41
42
43
44
45
46
47
48
49
50
51
52
/**
* Invoke application
*
* This method implements the middleware interface. It receives
* Request and Response objects, and it returns a Response object
* after compiling the routes registered in the Router and dispatching
* the Request object to the appropriate Route callback routine.
*
* @param ServerRequestInterface $request The most recent Request object
* @param ResponseInterface $response The most recent Response object
*
* @return ResponseInterface
* @throws MethodNotAllowedException
* @throws NotFoundException
*/
public function __invoke(ServerRequestInterface $request, ResponseInterface $response)
{
// 获取路由信息
$routeInfo = $request->getAttribute('routeInfo');

/** @var \Slim\Interfaces\RouterInterface $router */
$router = $this->container->get('router');

// If router hasn't been dispatched or the URI changed then dispatch
if (null === $routeInfo || ($routeInfo['request'] !== [$request->getMethod(), (string) $request->getUri()])) {
// Router 分配路由并将路由信息注入至 $request
$request = $this->dispatchRouterAndPrepareRoute($request, $router);
$routeInfo = $request->getAttribute('routeInfo');
}
// 找到符合的路由
if ($routeInfo[0] === Dispatcher::FOUND) {
// 获取路由实例
$route = $router->lookupRoute($routeInfo[1]);
// 执行路由中间件并返回 $response
return $route->run($request, $response);
// HTTP 请求方法不允许处理
} elseif ($routeInfo[0] === Dispatcher::METHOD_NOT_ALLOWED) {
if (!$this->container->has('notAllowedHandler')) {
throw new MethodNotAllowedException($request, $response, $routeInfo[1]);
}
/** @var callable $notAllowedHandler */
$notAllowedHandler = $this->container->get('notAllowedHandler');
return $notAllowedHandler($request, $response, $routeInfo[1]);
}
// 找不到路由处理
if (!$this->container->has('notFoundHandler')) {
throw new NotFoundException($request, $response);
}
/** @var callable $notFoundHandler */
$notFoundHandler = $this->container->get('notFoundHandler');
return $notFoundHandler($request, $response);
}

上面的代码抛开异常和错误处理,最主要的一句是 return $route->run($request, $response);Route 类的 run 方法,代码如下:

1
2
3
4
5
6
7
8
9
10
11
12
13
14
15
16
17
18
19
20
/**
* Run route
*
* This method traverses the middleware stack, including the route's callable
* and captures the resultant HTTP response object. It then sends the response
* back to the Application.
*
* @param ServerRequestInterface $request
* @param ResponseInterface $response
*
* @return ResponseInterface
*/
public function run(ServerRequestInterface $request, ResponseInterface $response)
{
// finalize 主要功能是将路由组上的中间件加入到该路由中
$this->finalize();

// 调用中间件栈,返回最后处理的 $response
return $this->callMiddlewareStack($request, $response);
}

其实 RouteApp 在处理中间件都使用了 MiddlewareAwareTrait 性状,所以在处理中间件的逻辑是一样的。那现在我们就看最后一步,Route 类的 __invoke 方法。

1
2
3
4
5
6
7
8
9
10
11
12
13
14
15
16
17
18
19
20
21
22
23
24
25
26
27
28
29
30
31
32
33
/**
* Dispatch route callable against current Request and Response objects
*
* This method invokes the route object's callable. If middleware is
* registered for the route, each callable middleware is invoked in
* the order specified.
*
* @param ServerRequestInterface $request The current Request object
* @param ResponseInterface $response The current Response object
* @return \Psr\Http\Message\ResponseInterface
* @throws \Exception if the route callable throws an exception
*/
public function __invoke(ServerRequestInterface $request, ResponseInterface $response)
{
$this->callable = $this->resolveCallable($this->callable);

/** @var InvocationStrategyInterface $handler */
$handler = isset($this->container) ? $this->container->get('foundHandler') : new RequestResponse();

$newResponse = $handler($this->callable, $request, $response, $this->arguments);

if ($newResponse instanceof ResponseInterface) {
// if route callback returns a ResponseInterface, then use it
$response = $newResponse;
} elseif (is_string($newResponse)) {
// if route callback returns a string, then append it to the response
if ($response->getBody()->isWritable()) {
$response->getBody()->write($newResponse);
}
}

return $response;
}

这段代码的主要功能其实就是执行本路由的 callback函数,若 callback 返回 Response 实例便直接返回,否则将 callback 返回的字符串结果写入到原 $response 中并返回。

0x09 总结

额……感觉写的不好,但总算将整个流程解释了一遍。有些琐碎的地方就不解释了。其实框架的代码还算好读,有些地方解释起来感觉反而像画蛇添足,所以干脆贴了很多代码/(ㄒoㄒ)/~~。说实话将整个框架的代码通读一遍对水平的确会有所提升O(∩_∩)O,有兴趣的同学还是自己通读一遍较好,所以说这只是一篇走马观花的水文/(ㄒoㄒ)/~。